Whether you’re completely renewing your bedroom furniture or simply replacing a damaged bed with a new one, instead of throwing out an unwanted sleigh bed, you can breathe new life into it by repurposing the wooden frame to use it in a new way. If you’re about to get rid of an old sleigh bed, we have five methods for turning a sleigh bed into a bench that can add an elegant touch to your home while saving the money you would have paid to buy the bench.
Methods for turning a sleigh bed into a bench include using the headboard to create a corner bench, transforming it into a dining banquette bench, changing it into an ottoman sleigh bench, or converting it into a sleigh bench with armrests.

Before repurposing your sleigh bed, make sure to check out these 5 ways to modernize a sleigh bed and give it a makeover and how do you close a sleigh bed mattress gap as well.
Method 1. Corner Sleigh Bench
A corner sleigh bench is a practical item that can be added to a corner of your living room or entryway. It takes less space than a traditional bench while serving the same purpose, and can be easily repurposed from an old sleigh bed. To find out more about sleigh beds, read our article on seven sleigh bed ideas to enhance your bedroom. You also might find interest in our guide to sleigh bed lift kits to learn more about simple sleigh bed storage solutions too.
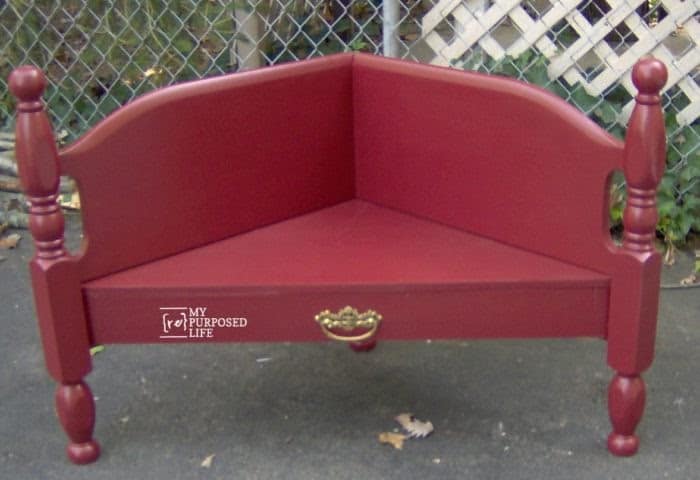
A wooden sleigh bed can be turned into a practical corner bench by cutting the headboard section vertically and using it as the bench’s seat back and front legs. Other portions of the bench, like the seat section, can be constructed from remaining parts of the bed or additional pieces of wood.
This process is easy to follow and the results can be very satisfying, but it will only work if the headboard is flat. Simple butt joints will not work for the typical curved sleigh bed headboards. This ebook titled, “The Project Gutenberg eBook of Woodwork Joints,” covers many woodwork skills that will come in handy for sleigh bed conversion projects. If you have advanced carpentry skills, you can substitute another suitable type of joint to make the corner bench from a curved headboard. For more information about the variety of headboard designs, read our article on sleigh bed styles.

To turn your sleigh bed into a corner bench, the headboard of the sleigh bed needs to be split into two parts. Then, the two parts are attached together at right angles. A third leg for the bench—which will also support the seat—is attached to the rear corner. The final step is to add a seat and a front brace. For a more comfortable bench, the seat can be upholstered.
Follow these steps for a more detailed description on turning the headboard of your sleigh bed into a corner bench.
Materials Needed
| Material | Example from Amazon | Price |
| Hole Jig System | Kreg R3 Jr. Pocket Hole Jig System | ~$30 |
| Wood Glue | Gorilla Wood Glue, 1 gallon Bottle, Natural Wood Color | ~$25 |
| Speed Square | Swanson Tool Co 7-Inch Speed Square | ~$10 |
| Electric Saw | Black & Decker Jig Saw, Smart Select, 5.0-Amp | ~$35 |
| Drill | Black & Decker 20V MAX Cordless Drill Combo Kit | ~$80 |
| 2-inch Screws | 2-inch HandyPak Finish/Trim Screws (2 pack with 100 per pack) | ~$25 |
Step 1. Divide the Headboard into Two Unequal Parts
These directions are only suitable if the headboard is flat. The first thing you need to do to start transforming your sleigh bed into a beautiful corner bench is to divide the headboard vertically into the two parts that will be joined to form a corner.
Pay close attention not to divide the headboard exactly in half, because one side will be butt jointed against the other, and, if the headboard is split evenly, one side will end up longer than the other—which will end up looking unbalanced and will make attaching the seat difficult. To avoid this, measure the half-way point and add the thickness of the wood to one side—one side should be slightly longer than the other by the thickness of the headboard at the point of the join. Once attached with the butt joint, the two sides will be the same length.
Step 2. Make a Butt Joint With Two Sections of the Headboard
After splitting the headboard, you need to join the two pieces back together at a 90° angle, with one side butted against the other. For this step, you’ll need wood glue, 2-inch screws, and an electric drill. Attach the two parts using both wood glue and screws for stability. This article from Wood Research explains the strength of wood glue in wood-to-wood joints, and how glue thickness affects the bond.
Step 3. Add a Third Leg, a Front Brace, and a Seat
Use a spare piece of wood, such as a length of 4”x4” wood, or a leg from the footboard, to create a third leg to add to the back corner of the bench. Adding a third leg in the back will also add support for the seat. Make sure that the third leg you add is the right length to produce a stable structure with the other two legs.
Use another piece of wood—which can be salvaged from the side of the bed—to make a front brace for the bench. This brace will help hold the seat and provide a clean finish to the bench.
Then, cut a seat section to fit onto the legs from a flat piece of wood, such as plywood, or possibly from the footboard—if it is flat. For the seat, accurately measure a right angle with the speed square and the length of both sides of the seatback. Cut out the plywood in this triangle shape. Using screws, securely attach the seat onto the framework that has been built.
The corner bench can simply be finished in a coat of paint—or it can be upholstered with foam and fabric of your liking (we’ve given you examples) to make it even more comfortable.
Method 2. Dining Banquette Bench
One of the best ways to repurpose a sleigh bed is to turn it into a dining banquette bench. A banquette adds a warm, cozy touch to a kitchen or eating nook.
To turn a sleigh bed into a dining banquette bench start by removing the headboard from the bed frame, then attach the seat to the front legs, and finally upholster the banquette sleigh bench in a luxurious fabric.
A sleigh bed almost begs to be turned into a dining banquette bench. The project is the simplest method to turn a sleigh bed into a bench. The headboard of the bed is the starting point for turning an old sleigh bed into a dining banquette. There are many uniquely designed headboards, and we recommend you read our article about types of headboards to choose a style that would work well with a banquette bench conversion project.
If necessary, cut a few inches off the headboard legs to make them a suitable height for the bench. Add a seat in the appropriate height for a dining chair, and attach the legs to the front. Upholster the headboard and seat by covering blocks of foam with fabric. For a more detailed description of an upholstery process, follow these steps.
Materials Needed
| Material | Example from Amazon | Price |
| Wood Glue | Gorilla Wood Glue, 1-gallon Bottle, Natural Wood Color | ~$25 |
| Electric Saw | Black & Decker Jig Saw, Smart Select, 5.0 Amp | ~$35 |
| Drill | Black & Decker 20V MAX Cordless Drill Combo Kit | ~$80 |
| 2-inch screws | 2-inch HandyPak Finish/Trim Screws (2 pack with 100 per pack) | ~$25 |
| Upholstery Foam | FoamTouch Upholstery Foam | ~$55 |
| Foam Cutter | RoMech Foam Cutter – Pro Electric Hot Knife (200W) | ~$75 |
| Upholstery Fabric | Solid Vintage Sensation Backed Upholstery Fabric | ~$10 |
| Upholstery Staple Gun | Majestika Heavy Duty Staple Gun for Upholstery with 1500 Staples | ~$15 |
Step 1. Remove the Headboard
To turn your sleigh bed into a dining banquette bench, start by removing the headboard from the bed frame. This will be the main component of the bench. If necessary, use your saw to cut a few inches from the headboard legs to make them a height that is suitable for a bench.
Step 2. Attach the Seat and the Front Legs
If possible, make use of the rest of the bed frame to create both the seat and the legs, or use extra pieces of wood for the seat. Attach the seat to the backrest with wood glue and screws. Sleigh beds have ornate headboards, footboards and feet, so using the sculpted feet will add interest to the banquette sleigh bench. Read our article on the different styles of sleigh beds to learn more about their gorgeous features. Add the two front legs, making sure they are the right height so that the seat is level. Use wood glue as well as screws to ensure the sleigh bench construction is sturdy.
Step 3. Upholster the Banquette Bench
If desired, the final step is to upholster the bench to make a beautiful dining banquette. For this step, you’ll need upholstery foam, a foam cutter, batting, upholstery fabric, and a staple gun. Cut the foam into pieces that are suitable sizes for the headboard and the seat of the bench. Apply the foam to the wooden base of the back and the seat. Add a batting layer and fabric of your choice, and staple it all to the seat back and to the seat.
Method 3. Ottoman Sleigh Bench
Another great way to turn your old sleigh bed into a bench is to turn it into an ottoman sleigh bench. This is a very elegant piece that can add a lot to your house. It is relatively small in size and won’t take much space in your room or be very heavy to move. You can use it in your living room, bedroom, or anywhere else.
To repurpose a sleigh bed into an ottoman first vertically cut the headboard and footboard into three pieces each, join them, and upholster them.
An ottoman bench constructed from an unwanted sleigh bed is a useful piece that can be used anywhere from a hallway to a living room. This will only work with a sleigh bed that has similar head and footboards. The steps are actually very simple, and the results are satisfying. If necessary, cut the headboard down to make it the same height as the footboard. Then, divide both the head and footboards into three parts each. Set aside the middle section because only the two outer parts will be used to create the armrest of the bench. Attach the end parts together with wood glue and screws. You may be able to use the middle part of the footboard to create a seat for the bench. If not, use a flat piece of wood sized for the seat. Here is a detailed description of how to upholster the bench seat.
Materials Needed
| Material | Example from Amazon | Price |
| Wood Glue | Gorilla Wood Glue, 1 gallon Bottle, Natural Wood Color | ~$25 |
| Electric Saw | Black & Decker Jig Saw, Smart Select, 5.0-Amp | ~$35 |
| Drill | Black & Decker 20V MAX Cordless Drill Combo Kit | ~$80 |
| 2-inch screws | 2-inch HandyPak Finish/Trim Screws (2 pack with 100 per pack) | ~$25 |
| Upholstery Foam | FoamTouch Upholstery Foam | ~$55 |
| Foam Cutter | RoMech Foam Cutter – Pro Electric Hot Knife (200W) | ~$75 |
| Upholstery Fabric | Solid Vintage Sensation Backed Upholstery Fabric | ~$10 |
| Upholstery Staple Gun | Majestika Heavy Duty Staple Gun for Upholstery with 1500 Staples | ~$15 |
Step 1. Cut the Headboard and Footboard
The first thing you need to do is to cut the head and footboards vertically into three pieces, keeping in mind that you’ll need the two outer parts—without the one in the middle—for creating armrests for the bench by joining them together. The combined total width of the two pieces should total the depth that you want the bench to be. For one arm, assemble the two parts of the headboard into one piece using wood glue and screws. Repeat with the pieces of the footboard for the second arm. Don’t worry about how it looks now because the whole thing will be covered in upholstery.
Step 2. Create a Seat
Create a seat for your bench that will hold the whole thing together. The two armrests with the legs will be attached to each end of the seat using screws. You can add wood glue for extra support. Make sure the four legs are even so that the seat will be level and comfortable.
Step 3. Upholster the Bench
Finally, upholster the bench. Start by cutting foam to fit the seat. Cover it with a layer of fabric by securing the fabric in place with a staple gun. Repeat the same process with the two arms.
Method 4. Storage Sleigh Bench
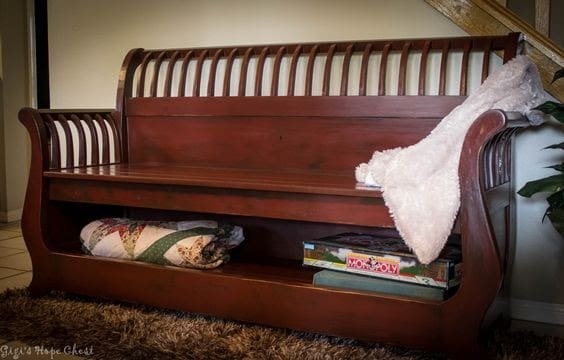
An unwanted sleigh bed can be turned into a practical and beautiful storage sleigh bench. The extra storage under the seat will be a welcome spot to stash a variety of items. A storage sleigh bench is a functional piece of furniture that is both practical and elegant. You can use it in your house for extra storage space while enjoying having a bench that can fit perfectly in any room.

To convert an unwanted sleigh bed into a sleigh storage bench, first, disassemble the bed Use the headboard to form the backrest of the bench. Then, cut the footboard vertically in half so the two halves can be attached to the headboard and used as the armrests. Finally, use the side rails to construct the seat and the storage section under the bench.
Here’s the full step-by-step guide for this process.
Materials Needed
| Material | Example from Amazon | Price |
| Wood Glue | Gorilla Wood Glue, 1 gallon Bottle, Natural Wood Color | ~$25 |
| Electric Saw | Black & Decker Jig Saw, Smart Select, 5.0-Amp | ~$35 |
| Drill | Black & Decker 20V MAX Cordless Drill Combo Kit | ~$80 |
| 2-inch screws | 2-inch HandyPak Finish/Trim Screws (2 pack with 100 per pack) | ~$25 |
Step 1. Disassemble the Bed
To turn your sleigh bed into a storage bench, first, disassemble the bed. You will need the side rails as well as the head and footboards to form the bench. The footboard will be used to create the armrests while the side rails will be used to create the seat and the storage section. The headboard will be used to create the backrest. Read our article on how to correctly disassemble a sleigh bed so that you don’t accidentally damage the pieces as you detach them.
Step 2. Cut the Footboard in Half
Cut the footboard into two even parts that are the depth that you will want your bench to be. If there is any extra wood from the middle, it can be discarded. These two parts of the footboard will be used for the armrests and legs of the bench. Attach the armrests to the headboard using wood glue and screws for extra support.
Step 3. Use the Side Rails to Create the Seat and Storage Section
Use the side rails of your sleigh bed to make a seat for your bench as well as the storage section below. Build a storage space for your bench by adding a shelving area under the seat and attaching it to the backrest and the footboard arms with screws and glue. Install the seat using the same method.
Method 5. Sleigh Bench with Armrests
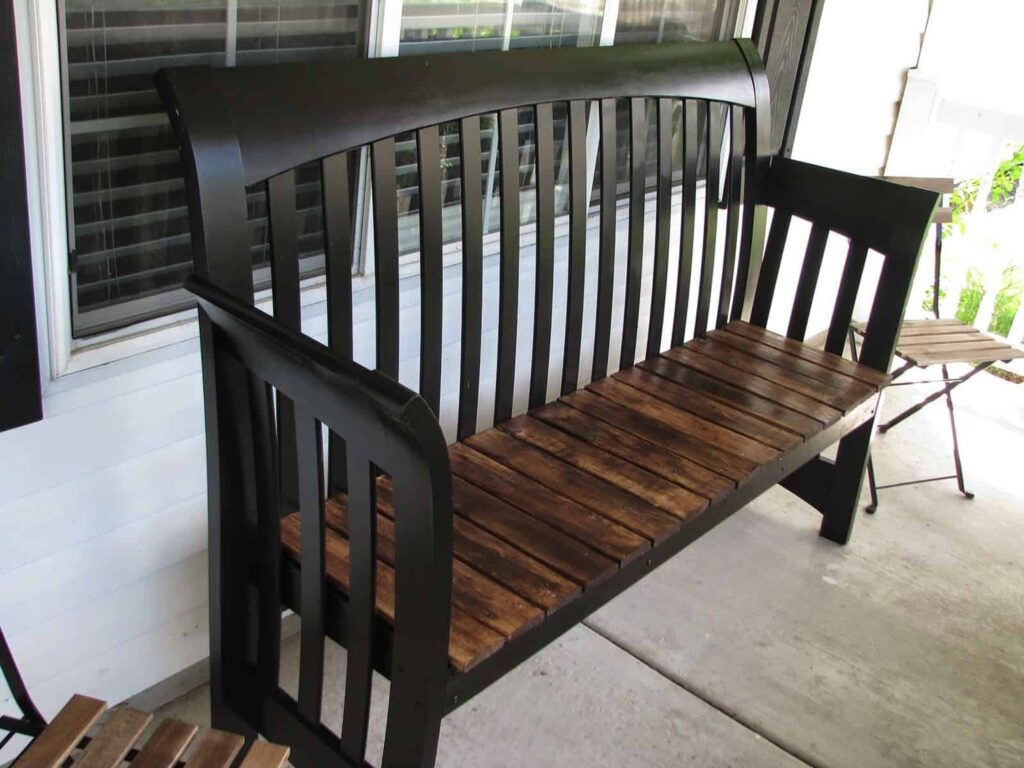
This method of turning a sleigh bed into a bench includes all the same basic steps mentioned previously. A sleigh bench with armrests can be very useful in your house or garden. It’s also very comfortable to use.
To make a sleigh bench with armrests, remove both the headboard and the footboard. The footboard will be used for creating the two armrests and the front legs of the bench. Divide the footboard in half for this purpose, and then attach the two sides to the headboard. Finally, create and attach the seat of the bench.
Here is a more detailed description of the construction process.
Materials Needed
| Material | Example from Amazon | Price |
| Wood Glue | Gorilla Wood Glue, 1-gallon Bottle, Natural Wood Color | ~$25 |
| Electric Saw | Black & Decker Jig Saw, Smart Select, 5.0-Amp | ~$35 |
| Drill | Black & Decker 20V MAX Cordless Drill Combo Kit | ~$80 |
| 2-inch screws | 2-inch HandyPak Finish/Trim Screws (2 Pack with 100 per pack) | ~$25 |
Step 1. Remove the Head and Footboards, and Cut the Footboard
Remove the head and footboards from the bed frame. Cut the footboard into two equal parts, so that their width will create a suitable size armrest. Read our guide to sleigh bed dimensions for more information about the height and width of various sleigh beds. Any extra wood that was cut from the middle of the footboard can be discarded.
Step 2. Attach the Sides To the Headboard
Use screws and glue to attach the arms to the ends of the headboard. The curve of the new armrest should arch outwards to provide more room on the bench and make it sturdy.
Step 3. Add the Seat
Finally, add a wooden seat to the bench. Attach it securely to the backrest and sidearms using screws and wood glue. If desired, you can upholster the seat to make the bench more comfortable, or simply add some cushions like these from Amazon as decor.
You might also find interest in our step-by-step guide explaining how to turn a sleigh bed into a porch swing in addition to our related article detailing how to turn a sleigh bed into a couch as well.

